Keeping your iPhone updated with the latest iOS is crucial for ensuring its optimal performance, security, and access to the latest features. However, the update process may sometimes encounter issues, causing the iPhone software update stuck. This guide will provide detailed, step-by-step instructions on how to troubleshoot and resolve such issues as your iPhone stuck during update process.
Part 1: Possible iPhone iOS 16/17 Update Stuck Issues You May Face
When updating your iPhone to iOS 16/17, you might face several issues. These could range from the iPhone getting stuck on the Apple logo, the “Update Requested” screen, the “Verifying Update” screen, or even the progress bar. Sometimes, the update might not start at all, or it might take an exceptionally long time to complete. These problems can be frustrating, but with the right troubleshooting steps, they can be resolved.
Useful tip: Fix blurry phone pictures on iPhone
Part 2: How to Fix iPhone iOS 16/17 Update Stuck Issues
Solution 1: Check Your iPhone Internet Connection and Charge iPhone to Over 70% Battery
A stable internet connection is a prerequisite for a successful iOS update. If you’re using Wi-Fi, try moving closer to the router or switching to a different network if the current one is unstable.
Also, ensure your iPhone has sufficient battery. If the battery level is low, plug your iPhone into a charger to prevent it from running out of power during the update process.
Solution 2: Force Restart iPhone and Delete the iOS Software Update
If the update remains stuck despite a stable internet connection and sufficient battery, try force restarting your iPhone. The process differs based on the iPhone model:
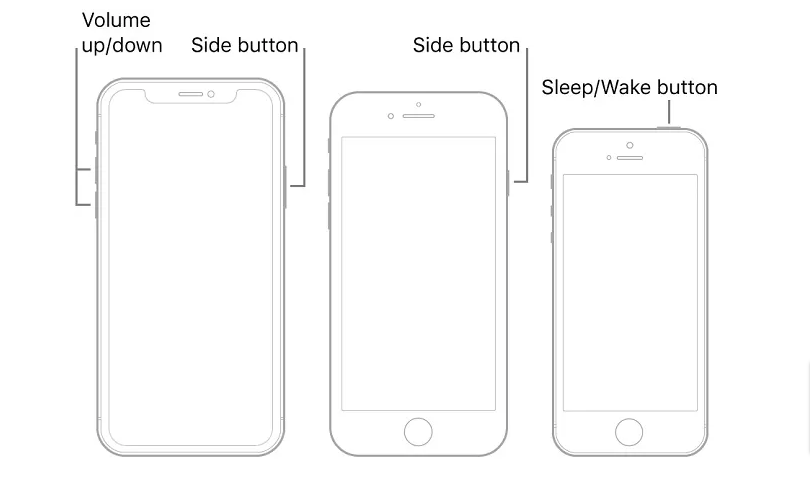
- For iPhone 8 and later: Press and quickly release the Volume Up button, then the Volume Down button. Then, press and hold the Side button until the Apple logo appears.
- For iPhone 7 and 7 Plus: Press and hold the Volume Down button and the Sleep/Wake button at the same time until the Apple logo appears.
- For iPhone 6s and earlier: Press and hold the Home button and the Sleep/Wake button simultaneously until you see the Apple logo.
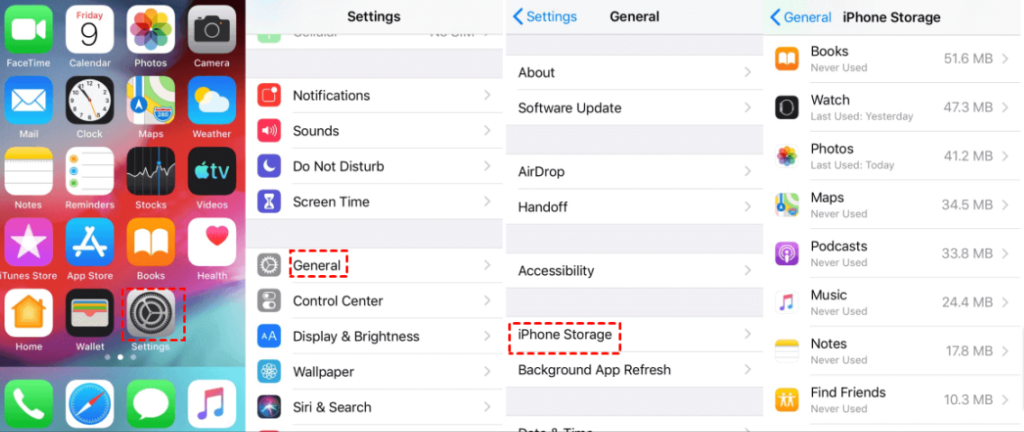
After the restart, go to Settings > General > iPhone Storage, locate the iOS update, and delete it. Now, try downloading and installing the update again.
Solution 3: Reset Your iPhone Network Settings
If your iPhone’s network settings are causing the update issue, you might need to reset them. Here’s how:
- Go to Settings > General > Reset.
- Tap on “Reset Network Settings”.
- Enter your passcode if prompted, then tap on “Reset Network Settings” again to confirm.
This will erase all your network settings, including saved Wi-Fi networks and passwords, cellular settings, and VPN and APN settings.
Solution 4: Free up the iPhone Space
Insufficient storage space can prevent an iOS update from installing. Check your iPhone’s storage by going to Settings > General > iPhone Storage. If necessary, delete unwanted files or apps to free up space.
Solution 5: Try Update iPhone System with iTunes
If the update is still stuck, you can use iTunes to update your iPhone. Here’s how:
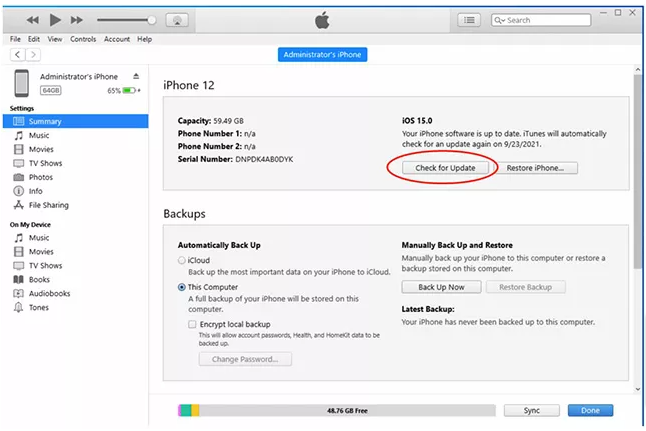
- Connect your iPhone to your computer and open iTunes.
- Click on the device icon in the upper-left corner of the iTunes window.
- Click on “Check for Update” in the Summary pane.
- If an update is available, click on “Update”.
Solution 6: Set iPhone to DFU Mode for Restoring with iTunes
If your iPhone continues to be stuck on the update requested screen and all other solutions have failed, your best option might be to put your device into DFU (Device Firmware Update) Mode and restore it with iTunes. This method is frequently used by experts at the Apple Support Centre to resolve iOS issues. It’s important to note that entering DFU Mode will erase all data from your device, making it crucial to back up your data beforehand.
Before initiating this procedure, consider using a data management tool like Tenorshare iCareFone to back up your device. This will ensure that you don’t lose any important information during the restoration process.
Entering DFU Mode varies depending on the model of your iPhone. Here are the steps for different iPhone models:
- iPhone 6 and Below:
- Switch off your device and connect it to your computer using a USB cable.
- Press and hold both the Home and Lock buttons for eight seconds.
- Release the Lock button but continue holding the Home button.
- Once the screen turns black, release the Home button. Your device should now be in DFU Mode.
- iPhone 7 and 7 Plus:
- Turn off your iPhone and connect it to your computer.
- Press and hold both the Side and Volume Down buttons for eight seconds.
- Release the Side button but continue holding the Volume Down button.
- When the screen turns black, release the Volume Down button. Your device should now be in DFU Mode.
- iPhone 8 and Later:
- Turn off your iPhone and connect it to your computer.
- Quickly press the Volume Up button, then the Volume Down button.
- Hold the Side button until the screen turns black, then press the Volume Down button.
- After five seconds, release the Side button.
- Once the screen is completely black, release the Volume Down button. Your device should now be in DFU Mode.
After successfully entering DFU Mode, iTunes will notify you that it has detected a device in recovery mode. Click on “Restore” to restore your iPhone via iTunes. Then, select “Restore and Update”.
This method has a high success rate in fixing iOS issues. However, it should be used as a last resort due to the data loss involved. Always make sure to back up your data before performing this kind of operation.
Solution 7: Erase All iPhone Data and Settings
If all other solutions fail to resolve the issue, erasing all content and settings on your iPhone might be your best bet. This method effectively returns your iPhone to its factory settings, eliminating any software issues that might have caused the update to get stuck. However, it’s important to note that this process will delete all data and settings on your iPhone, making it crucial to back up your data beforehand.
Before initiating this procedure, consider using a data management tool like iCloud or iTunes to back up your device. This will ensure that you don’t lose any important information during the restoration process.
Here are the detailed steps to erase your iPhone:
- Step 1: Navigate to Settings: On your iPhone, go to the “Settings” application. This is typically found on your home screen and is represented by a gear icon.
- Step 2: Go to General: In the “Settings” menu, scroll down and tap on “General”. This will lead you to a menu with various iPhone settings.
- Step 3: Select Transfer or Reset iPhone: In the “General” menu, scroll down to the bottom and tap on “Transfer or Reset iPhone”. This will lead you to a new menu.
- Step 4: Erase All Content and Settings: In the “Transfer or Reset iPhone” menu, tap on “Erase All Content and Settings”. You will be prompted to enter your passcode to verify this action.
- Step 5: Confirm Erasure: After entering your passcode, you’ll be asked to confirm your decision. Tap on “Erase iPhone” to confirm. Your iPhone will then begin the process of erasing all data and settings.
- Step 6: Set Up Your iPhone: After the erasure is complete, your iPhone will restart. You’ll then be prompted to set up your iPhone as if it were new. Follow the on-screen instructions to complete the setup.
- Step 7: Try the Update Again: Once your iPhone has been set up, try updating your system again. With all previous settings and data erased, the update should now proceed without any issues.
While this method is effective, it should be used as a last resort due to the data loss involved. Always make sure to back up your data before performing this kind of operation.
Part 3: How to Avoid iPhone Stuck on Preparing iOS Update Again?
To avoid encountering the same issue in the future, it’s crucial to regularly back up your iPhone. Regular backups ensure that even if an update fails, you won’t lose any data. There are several ways to back up your iPhone, including using iCloud, iTunes, or third-party tools like Eseus MobiXpert.
Using iCloud
iCloud automatically backs up your iPhone daily when your device is connected to Wi-Fi, plugged into power, and locked. To use iCloud for backup, follow these steps:
- Connect your device to a Wi-Fi network.
- Go to Settings > [your name] > iCloud.
- Tap iCloud Backup.
- Tap Back Up Now.
Using iTunes
You can also use iTunes to back up your iPhone. Here’s how:
- Connect your iPhone to your computer and open iTunes.
- Click on the device icon in the upper-left corner of the iTunes window.
- Under the Summary section, click on “Back Up Now”.
Using Eseus MobiXpert
For a more comprehensive backup solution, you can use third-party tools like Eseus MobiXpert. This tool not only backs up your data but also offers data recovery, data transfer, and system repair solutions. To back up your iPhone using Eseus MobiXpert, follow these steps:
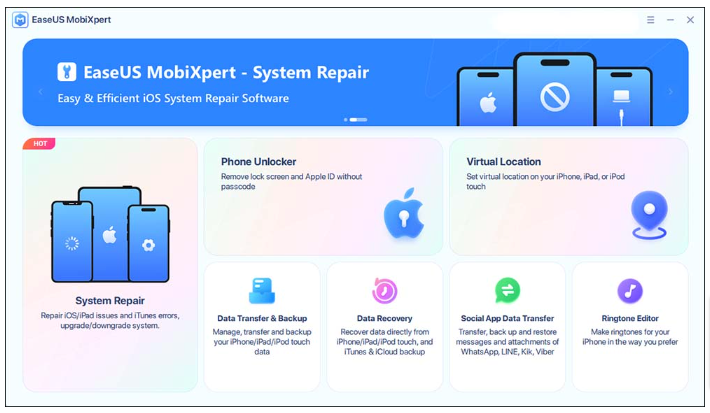
- Download and install Eseus MobiXpert on your computer.
- Connect your iPhone to your computer and launch Eseus MobiXpert.
- Click on “Backup & Restore” from the main interface.
- Select the file types you want to back up and click on “Backup”.
By regularly backing up your data, you can ensure that your files are safe even if your iPhone gets stuck on preparing an iOS update again. Remember, it’s always better to prevent a problem than to fix it.
Part 4: FAQs about iPhone Software Update
Q1: Why is my new iPhone stuck on software update?
There could be several reasons why your iPhone gets stuck during a software update. These include incorrect network settings or unstable Wi-Fi connectivity, software bugs and errors, glitches in the iOS system, or insufficient internal storage. If you’re updating your iPhone using a poor Wi-Fi connection, it may cause your iPhone to freeze during the update. Corrupted applications and software errors can also interfere with the download and installation of the new iOS. Additionally, if your device has little or no internal storage, the update is likely to fail, causing your iPhone to freeze during the update.
Q2: How long does it take to update iOS?
The duration of a complete software update depends on several factors, including the speed of your internet connection, the quality of your hardware, and the available storage on your iPhone. On average, if everything goes smoothly, it should take about 20 to 40 minutes to finish an iOS update. This includes downloading the new iOS installation package, installing the package, and setting up the device.
Q3: How can I update my iPhone to iOS 17 wirelessly?
If your device is compatible with iOS 17 (available for iPhone XR and later models), you should receive a message stating that an update is available. To update your iPhone wirelessly, follow these steps:
- Connect your iPhone to a power source and a stable Wi-Fi network.
- Go to Settings > General, then tap Software Update.
- If there are two options available, choose the software update version you want.
- Tap Download and Install, enter your passcode, then tap Install Now.
Conclusion
Updating your iPhone’s iOS is essential for optimal performance and security. However, the process can sometimes hit a snag. If your update gets stuck, don’t panic. Follow the detailed steps outlined in this guide to resolve the issue. Remember, regular backups can prevent data loss in case of update failures. Stay updated, stay secure!